|
|
|
Type of files we accept:
|
|
What color mode should my files be?
If you send us an RGB file, there is a chance that a color shift may occur and you may not be satisfied with your job.These colors are in RGB

These are the same colors but in CMYK

You should always start and finish your designs in CMYK color mode.
|
| |
|
How should I set up my bleed and crop marks?
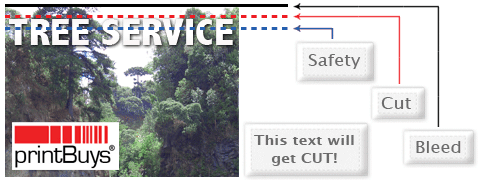
Bleed must extend further than the cut line. Using one of our templates can help you visualize this. Please keep all text and anything you do not want cut at least .125" away from the cut line.
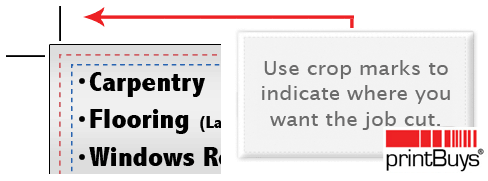
When sending an .eps or .pdf, make sure you include crop marks so we can cut the job correctly.
|
| |
|
| |
How should I set up a Spot UV job?
When creating a Spot UV job, You must include a Spot UV template file along with the regular full color file. The Spot UV template file is used to show where the UV will be placed.
 Normal CMYK Print File Normal CMYK Print File  Spot UV Template File Spot UV Template File
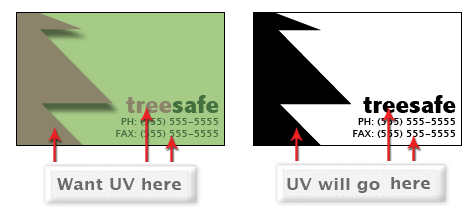
Use 100% K to indicate where you would like the UV. White will indicate no UV.
Remember "If it's white, you can write!"
|
| |
How can I set up a file for silver ink?
Silver ink files must be sent in a vector format. You must use a vector program, like Illustrator or Indesign, to call out the object you want in silver ink.

To indicate the silver ink, you must set the object color to Pantone¨ 877 C. Any other color will not be accepted as silver. Also, labeling the layer as "silver mask" or "silver" will not qualify your file.
- Vector Based Programs
-
-
-
-
-

Remember, silver is a spot color and transparencies like drop shadows should be avoided.
|
| |
How do I set up a Metallics Unlimited (MU) file?
With our Metallics Unlimited (MU) system, you can make any CMYK color or full color image into a metallic color. MU jobs must be created in Photoshop. In addition to your full color artwork, you must add a channel to your final file.
1. After creating your full color design in a photoshop layer, select what you would like to be metallic with the magic wand or selection tool.
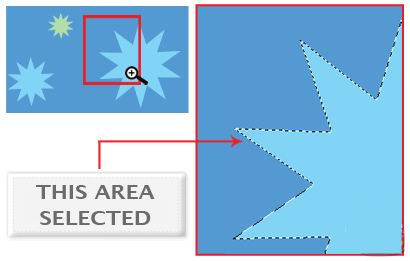
Make sure when making your selection, to only select the area that you need metallic. The MU system will not work on gradients so do not include them in your selection.
|
After the selection is made, go to the channels pallete, then the channels menu, and select "New Spot Channel..."
|
When the "New Spot Channel" window shows up make sure your settings look like this...
|
Make sure the name of your spot channel is "mu channel". Under "Ink Characteristics", color is set to, C 0 M 0 Y 0 K 100. Solidity is set to 100%. Your channel window should now look like this. Make sure your channels window looks like this before saving.
|
The black parts indicate what will be metallic and the white parts will print as normal CMYK ink.
Remember, the color or area you indicated in the channels must match the same area you want metallic in your layers.
|
Save your file as a "Photoshop DCS 2.0" file. Make sure your format options look like the image on the right.
The extension for this file will be .EPS. Your file is now ready to send to Print Buys. Remember, MU works better with lighter colors and we cannot guarantee any color matching.
|
|
| |
How do I export a .pdf correctly?
When exporting from any program such as Indesign or Illustrator, use these settings to make sure your .PDF files export correctly.
Export settings for .PDF files
Adobe PDF Preset is set to: Press Quality

|
| |
What is rich black and how can I get it?
Rich black is an ink mixture of solid black, 100% K, with additional CMY ink values. This results in a darker tone than black ink alone. If you print black alone as 100% K, the resulting black may not be as dark as you might like.
100% K on screen

100% K after print

We recommend using
C 60 M 40 Y 40 K 100
This will give you a deep, dark, rich black.
|
| |
| |
|
| |
|